Post by: Meiscool-2 on December 17, 2005, 04:39:33 AM
1 The basics
a the 'yeses'
b the 'noes'
2 The specific Basics:
a Mountains
b Forests
c Deserts
d Plains
3 Adding to a map
a Eventing
b Overlapping
c Effects
4 More will be added
1 Ok, to get to the basics of mapping. There are several 'yeses' and several 'noes' for mapping.
The Yeses : A good map can or should have any of the following
Events
Effects
Eye-catchers
Etc.
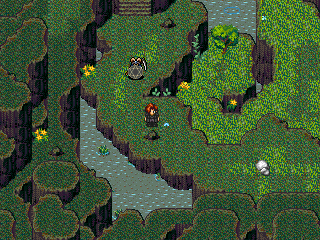
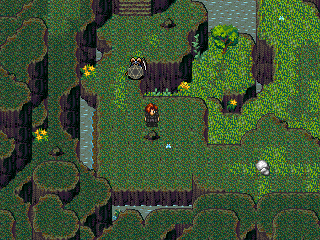
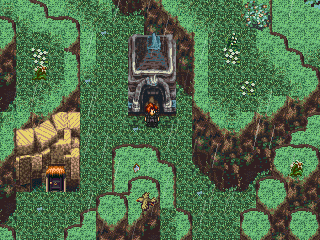
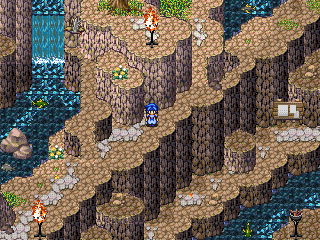
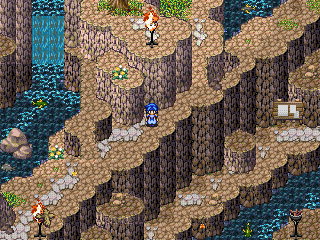
Events could be as little as a butterfly, to as big as dog running around. Events make the map less repetive, as every time you enter the map, there's a new event to look at. For example:
Which of these two pictures looks better:
Picture A:
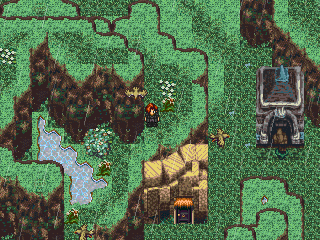
Or Picture B:
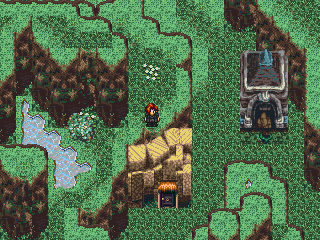
I'm sure that most of you are thinking picture A looks better. It has moving flowers, birds, rain, and ripples in random places to make it look like the rain is making water rise above the land for a swamp effect. I could've probably added butterflies and people, but you get the point.
Effects are things like screen flashes, pictures, animations, and weather events. Maps with one of these have a special touch added to them, and makes them look more unique among other maps.
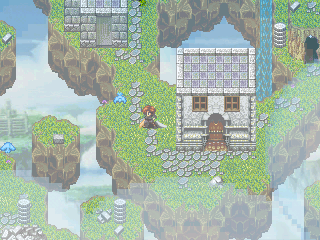
Again, which of these two maps seems more unique?
Picture A:
Picture B:
This time I'm sure you probably said picture B. They have little difference to them, but one has clouds, and the other does not. The cloud pictures add a nice touch to the town, making it feel more peaceful.
Eye-Catchers are another key thing for maps, but you don't want them all the time. Eye Catchers make you want to look at a certain part of the map. Normally, Eye Catchers are things that are either bright, moving, or large. Placing an Eye Catcher in the right place will often bring out the best in your maps, no matter what's surrounding the Eye Catcher. Easy to make Eye Catchers would be backgrounds, water falls, etc.
Due to the fact that I can't post more then 8 images at once, the rest will come at a later post. Please do not post untill I tell you you can. I'd rather not have a bunch of posts between my do's and don'ts. Thankyou for reading.
Post by: Meiscool-2 on December 17, 2005, 04:41:30 AM
Popular noes:
-Stairs that only take up one square that move you from map to map (example would be the RTP stairs in the chipset)
-Ladders more then 5 squares tall (sure, there can be exceptions, but what I mean is ladders that take you up REDICIOUSLY high and into another map)
-Straight Paths are a no-no as well. They get repetive, and they often go on forever with nothing happening on them. Curved paths are a must!
-Squarish places arent liked either. They make a map look unnatural, and don't add to the atmosphere at all. Example:
Picture A:
Picture B:
As you can see, picture A's mapping is much more natural looking.
-Repetiviness is not liked. Having the same thing in your maps over and over just won't do. You need to vary what you put in your maps, add things like caves and events between maps, or put eye catchers in some maps to drown out the look-alike-ness you have going on.
-Over Crowding must go. Crowding gives you something to look at, and that is always liked, but making it to where you have only 1-2 spaces of movement choice is not wanted. People want to be able to take a different route of their choosing when they walk, not a path prechosen for them.
-Lack of Detail. A person can have some of the most detailed maps ever, but lack a good map solely because they only detail paths and places that your hero walks. People don't want to look at their hero ALL GAME LONG, they need something to look at instead. Eye Catchers and detail in places that you can't walk easily cures this.
-Spacing. The opposite of crowding. In this case, say you have a lot of objects/events, but they are to spaced out. This is most common in towns, where you have to walk a full screen to see a new house or villager. Objects need to be close together to complement each other. If they are to far apart, they will look like randomly placed..... things.
-Repeating goes in two ways.
Events: Having events such as people that say the same thing over and over, or having the same birds with the same color and same flight pattern, or having the same fish with the same speed and movement, gets to have no positive effect on people, as they begin to expect what's going to happen next. Mix it up some, make the movement different for each one, and in special places (like towns that you'll be in for a long time) make the events a custom movement where the bird (just an example) flies to one place, drops down, moves awhile, and pops back up.
Objects- Repeating objects is just as bad. Things that go in a pattern don't always look good. Example, if you have a garden, you'll have lots of flowers in it, but don't always use the same flowers in the same places. Change it around. Put one here instead of there and etc.
Post by: Meiscool-2 on December 17, 2005, 04:43:51 AM
This is the place to learn about how to map certain places.
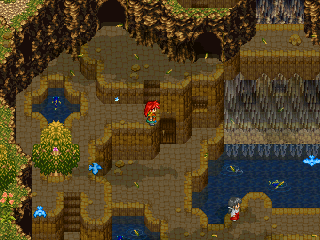
Mountains : Mountains can be the most beautiful place in a game, and can also be the most dull. You have to decide. Making your cliff edges straight is not the good way to make a mountainous place. Mountains need to be varied, they need to twist and turn. Also, another common flaw with mountains is the lack of elevation. They make one small, high up path, and then no other paths. Mountains have many elevations, and many cliffs at different heights. Example:
Picture A:
Picture B:

As you can probably guess, the map I actually use is picture A.
Other things that mountains should, and shouldn't have, is water, backgrounds, and clouds. Waterfalls and other things are a must in most cases, but having a little pool here and a little pool there isn't good, as well as having a small pool that some how turns into a waterfall, or having the end of a water fall flow into a small pool that doesn't go anywhere. Examples:
Good waterfall.
Bad Upper waterfall.
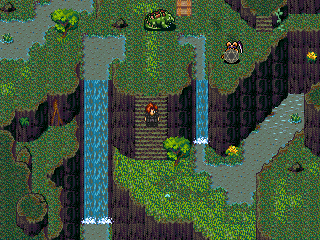
Bad Lower waterfall.
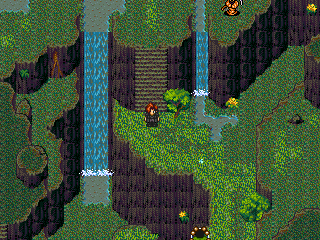
Hopefully, youll see what I mean when I say bad and good water falls.
Backgrounds. Almost any background can be used (meaning if its something like clouds and etc, nothing like warped space and etc.), but in my personal opinion, clouds dont work well. If you have something with clouds AND land, its ok, but your mountain would have to be REALLY high to not see any land from where you would be standing at.
Clouds. Only use clouds for places that you want to be windy, or high up places. A more canyon type mountain (such as the one I use in my pictures) wont be very suitable for clouds, but higher up ones (such as the ones from Aces game the Omega Seal) would be a better place to put clouds at.
Also, a last touch to a mountain is snow. The higher up you go, the colder it gets. Put something in there to belay that effect, such as random snow patches, snow weather effect, etc.
Post by: Meiscool-2 on December 17, 2005, 04:45:39 AM
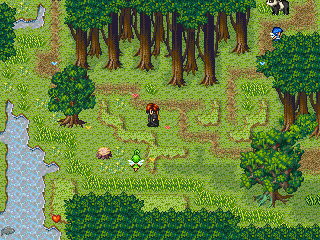
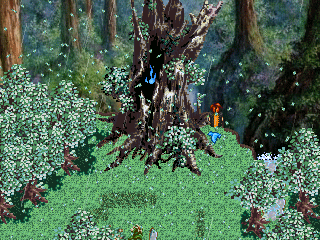
Pictures with natural look
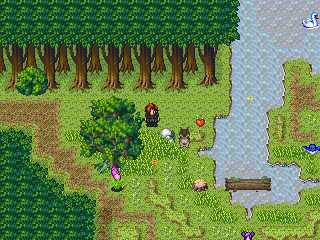
Pictures without natural look
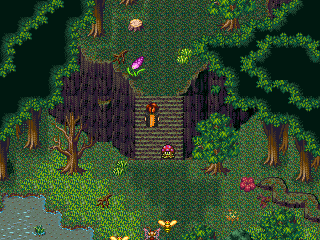
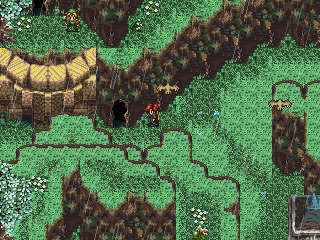
Your forest maps should also make sure to include some sort of path. It doesnt have to be a brink road or dirt road or etc, just something that someone will follow. For example, in this picture, there is an actual dirt road:
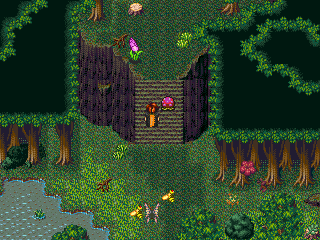
But, in this picture, all there is to make a path is saturated grass (the weird things in the water are pictures of falling leaves, which Ill go through in the events section)
People subconsciously follow these paths in their mind. They see some ground type that doesnt look like everything around it, and begin to follow it. Its human instinct.
The rest will follow shortly. I couldn't finish it all in one post, but I will later. Thus meaning you can go ahead and post now.
Post by: Robotam on December 17, 2005, 10:25:47 AM
Post by: Dragonium on December 17, 2005, 01:13:49 PM
Maybe I'm stoopid, but what's the difference between the "good" and "bad" screenshots for natural forests (The first ones)?
Post by: Bluhman on December 17, 2005, 02:49:39 PM
Post by: Red XIII on December 17, 2005, 02:52:51 PM
now i know what to change in some maps o´mine
Post by: CoolZidane on December 17, 2005, 03:22:17 PM
Post by: Meiscool-2 on December 17, 2005, 04:28:57 PM
Towns Thank you Bluhman for reminding me of this. Towns are one of the most important parts in a game solely because of the huge amount of time you spend in them. If youre game is something like mine, were you get to a town and stay in that central area for hours doing quests, its important to have a good looking town that has many things to do in it. There are three types of towns in my opinion. They are:
Castles
Open Plains
In closed areas (such as towns in a cave, on a mountain, etc.)
Castles: Castle towns are important to many games, but an important thing is to have residences. All castles have rooms for there knights to live in, but for some reason people tend to forget about that. However, Im talking more about the exterior of a town, not the insides. Castle towns should have houses on the outside, in a courtyard fashion. Example:
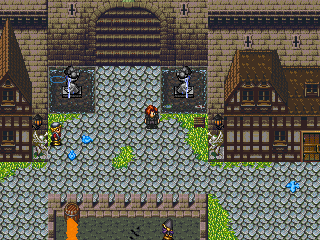
As you can see, the place still has an outdoor castle feel, but its also got all the things a town would have, such as houses and people and bird and on and on. You also dont need a lot of space between places like you do in other maps, and as I go into property, youll figure out your own ways of doing that yourself (canvas tents, welcome mats, etc.)
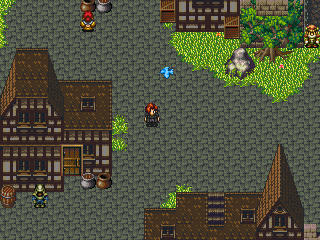
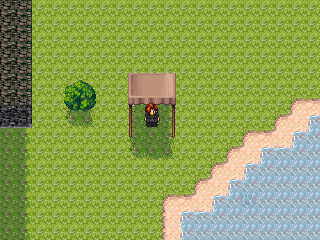
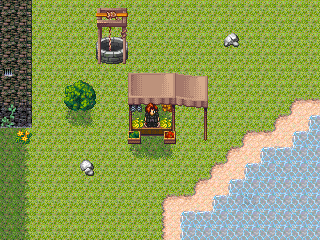
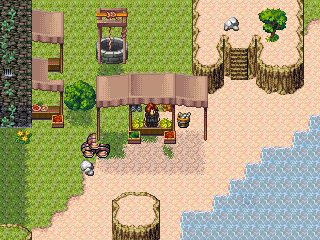
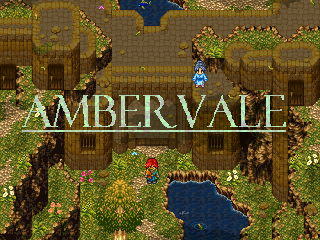
Open Plains: These are by far the most common of all, and appear at least 5 times in most games. That is why its important to make them stand out. Space is the most important thing in any town, and its especially important here. You need a lot of space between each house, but you dont want it to look like theres a lot of unclaimed land. Thats what thing I call property markers are for. These markers arent houses, but they show property and ownership of a house still the same. Examples:
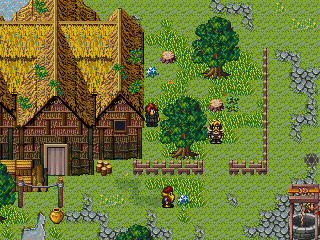
Through those pictures, one can easily see what I mean. The fences, potters, plants, trees, paths, wells, and all other things mark a clear property for each house. Though a house only takes up so much room, the fences and other things take up a much larger space, thus eliminating that space of nothingness between houses.
The second most important thing in Open Plains towns is generics. NONE of the houses should look the same. Its ok to have a house or two that are the same if the chipset isnt very good, but other then that, I would have to say that all houses should look different. Its not that hard to make a good house, and it doesnt take that much effort to copy it, and change it a bit.
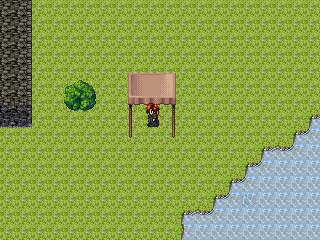
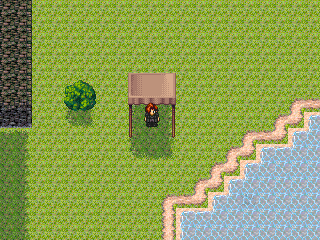
However, that last rule can be swayed with proper spacing. Example:
You can see that those two houses are exactly the same, but, because of whats surrounding them, they both look good. One has trees and a garden around it; the other has saturated grasses and more high cliffs. As long as you vary your mapping a little between houses that look alike, then it shouldnt be to bad.
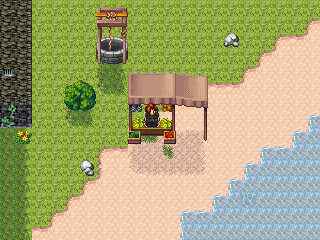
Paths for towns. Open Plains towns always need a path. This can most often be done with dirt or rubble for the best effect. In the pictures above, again, the path is the darker grasses. Just like in the forest, people will follow this path in their mind without even knowing it.
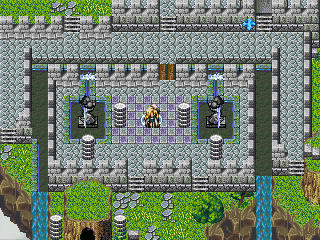
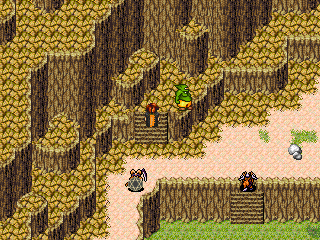
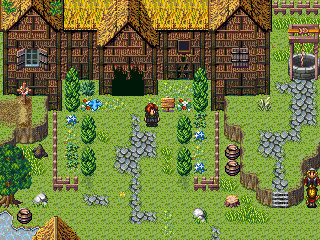
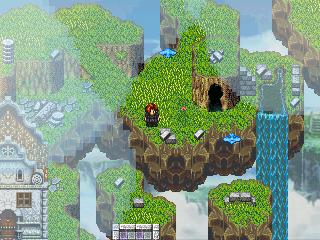
In closed Areas: This can be many things. Im saying here, that its a place without a limitless amount of land, such as a cave, mountain town, floating island, etc etc. These maps should have the same things In them as an Open Plains town, space and property. However, because its supposed to be a limited area, the houses and property should be loads smaller. Its important to include paths in this as well, but the most important thing is to include areas you cant walk at. A secluded area always has more then one strip of land to walk, but they arent always connected. Example:
Though you cant walk to that part in the lower corner of the floating island town, you can see it. Also, as you can see, this place has a basic path going from house to house. This is a good example of what a path should be like. The path doesnt always have to be connected, but its a good idea to have one. In fact, I think it looks better the way it is in that last picture then a full path. It still gives the effects of a path, but doesnt look like something youre actually supposed to walk along, if you get what I mean.
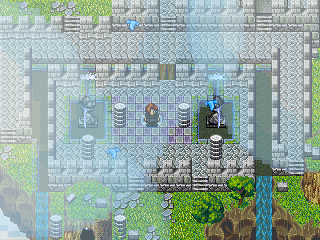
In Closed Towns are the easiest towns to make beautiful. Your peasants, (whatever residents you have) dont need real detailed dwellings like the big fancy houses in the Open Plains maps. Places like a cave for example, wouldnt have houses as it is. They would have small caves that people would sleep in, and thats mostly it. Thus meaning, your main detail should go on the outside on limiting space but still making it seem like you can walk a wide array of paths. Example (yes, I know I did a waterfall boo-boo)
As you can see, right here hero can chose to go up to the temple, go right and go up the slope to the house in the corner, go right and go down to the basement of that same house, or go left into the little dwelling.
Rules for every town:
Dont crowd, as crowding will make it difficult to put in events, solely because the people will move into your way, and you will have to stop moving for awhile and wait for the people to get out of your way.
Dont put a lot of people in the town. Basically, dont put some 20 people walking outside in the town grounds. Unless youve got the space, or each event is really important, try to limit it. I find that putting 1-3 people per LARGE house youve got walking outside, and 1 person for every 2 SMALL housings you have work pretty well in most cases.
Eventing is a must in all cases. Animals should be on or near the top of that. If you look, almost all of my in-town pictures have a bird or butterfly in them. These animals add a peaceful effect on the town. If youre going for an evil town, then you should still have animals, but make them things like ravens, crows, and dead/near-dead beasts. Picture effects are good as well. Clouds and cherry blossoms are two of my favorite ones to use, but rain and other weather effects work just as well.
Avoid repeating yourself as much as possible. In real life, most times no two houses look the same, even in poverty stricken places. Make everything different.
Put in things like wells and docks as often as you can. Putting in those not only decorates the place a bit, but also lines you put to put in events about a guy saying he dropped his ring down the well, or a boy saying he can skip the stone the farthest. Easy events.
Have loads of objects between your property lines. Anything will do, a tree, a broken down cart, a rock, anything. No one wants to look at an empty space.
Thats it for towns. You can go ahead and reply, it will be awhile before I finish the desert and plains parts of this tut.
Post by: Meiscool-2 on December 17, 2005, 05:17:05 PM
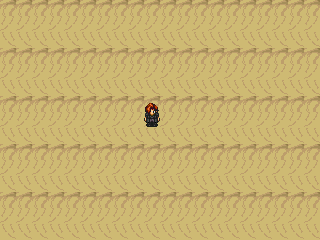
DESERTS DONT LOOK LIKE THAT! THEY LOOK LIKE THIS!
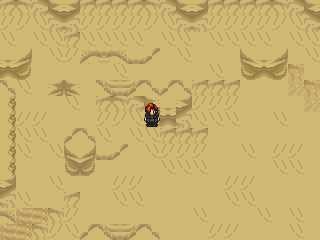
Now, I know that it may be a bitch to make a huge desert that looks like that, but no1 wants to walk through a map with nothing in it. Seriously. As to eventing a desert, sand storms are a must. Dust clouds, anything. Also, tinting the color to make it brighter and more golden works well too. There really isnt a whole lot to deserts, and depending on the kind you want to make it how they are done. If you want one with a canyon type feel, then go back to the mountain section and look at that. If you want one with an endless voyage feel, then basically look at my last picture, and mimic that a lot. If youre going for a pass the trail sorta thing, then youll want to have ruined buildings in there. More objects and less sand in other words.
Does and dont for the desert:
Dont make it a spanning wasteland. And if you do, at least put stuff in it other then nothing.
Put an oasis here and there, oasiss are refreshing not only for the hero, but for the players eyes.
DONT put birds in this. Unless youve got a buzzard or something, dont put birds in. Instead, put snakes and lizards.
Dont put dead bodies along desert paths. Ive seen games where all the desert your passing through is a safe path between two towns, and there are dead bodies lining the roads. Thats just wrong .
Make some sort of event that creates a thirst meter. For example, you could make it to where if youre in the desert for so long, you get thirsty and game over. I know it has nothing to do with the mapping, but deserts are so often so bleak that sometimes the hero needs something to think about other then nothingness.
Post by: Meiscool-2 on December 17, 2005, 06:33:55 PM
Three types of Plains:
-Completely Open
-River Bed
-Edging Plains
Completely Open plains deal with plains that are none other then completely open. I tend to stay away from these, but sometimes they have to be put in. Most often, they are used as a road from one place to another, and nothing more. Plains like these can be made simply by putting random ground tiles in random places, and objects that complement those tiles. Example: A tree wouldnt go on a dirt path, and a rock wouldnt go on the flowers. There are exceptions, but thats just a basic idea.
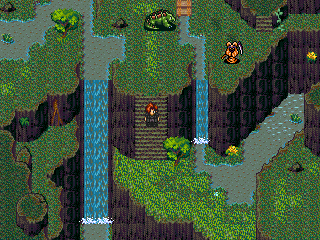
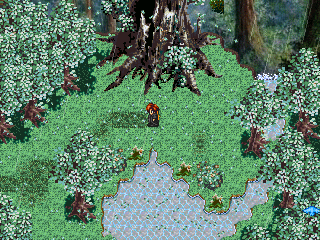
River Beds are plains that have a river next to them. These are easy enough to make, but take time to make look good. They should have trees lining the sides of the river, be abundant with plants and animal life, and be a peaceful or reflecting area. Examples:


River Beds also have some sort of pathway that is VERY clear. I use a dirt road, but you can use whatever you want. Good ways to improve River Beds are to have large amounts of over head birds and butterflies, and to have a water fall here and there.
Edging plains are any kind of plains that are supposed to be the edge of something. The edge of a mountain, the edge of a forest, etc. These types of plains should then follow intermediate rules. Apply part of the plains rules, and part of the mountain rules to the edge of a canyon for example.
Examples of a canyon (this is a partly custom chipset that isnt yet done, so thats why some things sorta clash)

This isnt exactly edging per say, but its plains place next to a mountain, and this is what the town looks like. Heres one thats edging of a forest:

As you can see, one side is plains, the other forest.
Now, there is no real way to make plains. Its just a sort of wing it kind thing. But, every plain you have should have something unique about it. For example, the two pictures of the canyon plains above are very unique, both in game and out of game. Its an edited chipset, and part of it is custom, so it has an out of game uniqueness. In game, I have no other place thats colored like that, or evented like this. Events for that place include a running water paranorma (meaning I made a waterfall paranorma, then I made three more with different water positions and had them change places from time to time.) , rain, butterflies, birds, swamp water sound effects (meaning if you step in saturated water, it makes a splashing sound), water ripples, fish, and some other things. No other places have the same fish/birds/ or colored butterflies. No other place has the same paranorma, and no other place has the same constant rain effects. So, in conclusion, just make every plain different from the last.
Post by: Black Massacre on December 17, 2005, 07:10:20 PM
Post by: Ian-TheResourceMaker on December 17, 2005, 07:14:00 PM
Post by: Meiscool-2 on December 17, 2005, 07:15:43 PM
Quote
Originally posted by Black Massacre
Nice tutorial. What about polar regions though?
I can do something on that later, but they are basically the same as anything else. A polar waste land would be a desert, a ice forest would be a forest.. etc etc.
Post by: coasterkrazy on December 17, 2005, 08:55:35 PM
Post by: Meiscool-2 on December 17, 2005, 09:56:42 PM
World Maps : The basis of many RPGs. Depending on what your game has to offer is how it will look and be. It's hard to decorate a world map in some ways, such as the 'you can look here but not walk here' way, because with boats and etc, there's always a way to get to places. But, I personally make things like this:
Caves- Caves need to have moutains surrounding them. And, I'm not just talking about a little bity mountain range, I'm talking about a lot of moutains. Caves should be linked, meaning that if a cave goes one way into a mountain, then the mountains should spand all the way to the exit of the cave on the world map.
Waters- Shallow waters should always be around the land, and deeper waters farther from the land. World maps should have plenty of rivers flowing through the land, and a water fall or two on it as well.
Forests- I hate seeing forests that go on forever. Forests are nice to have, but I'd rather see them in small bunches. Put a bunch of ten tiles there, 13 here, and 15 way over there. Don't group them up in a 30 tile clump.
Grasses- Darker grasses should outline the forests if possible, and thick grasses should be near any ponds or lakes you've got. Again, having a different color grass then the grasses around it makes a path in a person's head, so use that to make any paths you want.
Deserts- Again, don't have your deserts go on and on. There's really nothing else to say about deserts.
Snowlands- Put some events here. You'll want snow and maybe a cloud or two. Do this just like you would any other part of a map, outline forests with darker snow and etc.
That's it for the world map. Again, because I don't make them, I'm sorry to not have pictures and stuff. I mean, I could make one for this.... but I'm to lazy.
Post by: Meiscool-2 on December 17, 2005, 10:04:24 PM
I will now take requests on questions on how to map special areas. Example: Someone could ask me what I do for a cave. I would then write a tut here on how I do it. Don't ask anything impossible from me, and don't ask anything small either, like how you map a bathroom (toilet.... bout it... see how short that was?) and etc. Don't ask something that I've already told you, or something similar to something I've already said (Like, don't ask me how to map a jungle when I've already done forests) Also, don't ask me something with a different generic (like, I've already done forests, so don't ask me how to do a snow forest). You can however, ask me what I would put in a snow climate, because I haven't yet done that.
I will be doing the eventing/overlaping and adding part of this tut soon... so yeah, just hold your horses.
Post by: Black Massacre on December 17, 2005, 10:17:33 PM
Post by: Meiscool-2 on December 17, 2005, 10:20:12 PM
Post by: MrMister on December 17, 2005, 10:32:11 PM
Post by: Moosetroop11 on December 17, 2005, 11:06:25 PM
Post by: MrMister on December 17, 2005, 11:16:05 PM
Post by: Meiscool-2 on December 18, 2005, 12:15:19 AM
Quote
Originally posted by Moosetroop11
I like this. But remember that these people have to get hold of the right resources first. Plus the coding for certain weather, etc.
Well, everything I described is custom... so yeah. People have to find their own ways of doing things, I just point them in the right direction.
Farms- See plains and town.
Beach- A beach would be just like a river bed plain, only instead or trees you would have rocks, and instead of grasses you would have different colored sands.
Post by: Black Massacre on December 18, 2005, 04:33:14 AM
Quote
Originally posted by Meiscool
Interior
Post by: MrMister on December 18, 2005, 06:12:22 AM
Quote
Originally posted by Meiscool
Farms- See plains and town.
Bitch are you fo' real?!? Farms are nine-hundred per cent different!
Post by: Archem on December 18, 2005, 07:51:42 AM
Post by: AsakuraHao2004 on December 18, 2005, 05:19:27 PM
Post by: DarkFlood2 on December 18, 2005, 05:21:11 PM
Post by: Meiscool-2 on December 18, 2005, 06:58:20 PM
Alright, Im going to start the adding on section. Also, Ill be doing an interior design to houses and castles, as well as caves soon enough.
Shadowing and Fading This is just one small add on that I want people to see. A lot of people have boring maps like this:
This makes me cry people. With only a few extra seconds of work, you can make it look a million times better. Lets start with the most basic of add-ons, Shadowing and Fading. By adding a darker grass to places, you can make a shadow effect. By adding sand to the water there, you can add a water fading to land effect. See here:
However, you will easily notice a bit of a problem there. The fact that the shadows and fading dont line up. This is where a key that not some many people know about comes in. Its called THE SHIFT KEY. By holding down the shift key and placing the tile where you want it to be, the ground tile you selected will take up the whole square. Example:

OH NOES! They dont fade in now. That, however, is a solvable problem. Simply by going back over the tiles next to the places where you want the tiles to fade in, you can create the fading effect that you want. Example:
Now, youve got a much nicer looking map. Its not nearly as boring as it was, even though its still pretty boring. Now, we can add more to it.
Objects are the second layer of a map, and are very important. Simply be placing a few random objects on a map, you can make it looks loads better. Example:
As you can, the map is beginning to look a lot nicer. Now, what youve got to do is link the objects together somehow. By reshadowing, drawing paths, and refading, you can achieve this. Example:
By adding more and more objects and changing the map some to suit the object placement, your small area can begin to take a new shape, much like this:
However, if youre like me, youll notice a few problems. First, because objects cant overlap, theres some spots that are missing things. Also, a few rules have been broken, like the squaring of land and the crowding of space. Some things will still have to be changed, but this is all we can do with just objects. Now we need EVENTS!
Eventing is the most important part of all. By adding second layer events over objects, you can get the image of two objects. By adding birds and animals, you can give life to your maps. By adding people, you can purpose. Check out this fully changed and evented map.

As you should be able to see, the change from beginning to end was drastic. Thats all it really takes, and isnt that hard to do at all.
I will go deeper into eventing in my next post, but this will give you the basics of SOME of the things Add-ons have to offer maps.
Post by: Dashman on December 19, 2005, 05:21:39 AM
Post by: VulcanRaven336 on December 19, 2005, 05:53:29 AM
Post by: Ace of Spades on December 20, 2005, 09:21:33 PM
Post by: Meiscool-2 on December 20, 2005, 09:43:43 PM
Quote
Originally posted by Ace of Spades
These are good tutorials, nice job. ^^ I actually think that this may deserve a sticky, it can do loads of help for people.
Already ahead of you ;)
Post by: Meiscool-2 on December 25, 2005, 05:17:16 PM
Here's the map that I did:

Now, there are some different things object wise and eventing wise I did here. The highlight of this though will be TRANSPARENCY.
Transparency is not all that important, but it adds a realistic feeling to the maps. If you look above, I put anything and everything (aka the rocks) nearby the water at a transparent lvl to make them look like they are under the water. If you don't do that, it still looks ok, but not as good. Example:

If you compare the two, you should notice that one looks more realistic then the other because of having transparent events rather then normal objects.
It is also important to make any charas and etc in the water transparent was well. You can do this two ways, either going into the database and seting it to make events 1/3, 1/2 or 1/1 transparent. Or, you can just make the event itself transparent. This is most important with fish. Example, in the two pictures above the fish are transparent, but in the one below, they are not:
Now they stand out a bit clearer, but in real life you wouldn't be able to see a fully illusive fish, so make them transparent one way or another.
Lastly (this has nothing to do with transparency) you should always try to find something to put at the bottom of a water fall to ensure that it doesn't look like it's just there. For example, in all the pictures above, the water fall has water splashing where it ends to add a realistic effect. However, if it doesn't, it will look choppy and crappy, like this:
That's it for today, merry X-mas and etc guys!
Post by: Seth Mitchell on December 29, 2005, 02:01:17 AM
Post by: Meiscool-2 on December 29, 2005, 02:11:13 AM
Quote
Originally posted by Seth Mitchell
Hey, with shading, how do you do like shading at an angle. As in like in aley ways. or on hte side of builinds.
You need either event's or something that the chipset comes custom with. You can do it other ways, but it looks less choppy if you just use a chipset that comes with oblique shading.
Post by: DragonBlaze on December 29, 2005, 05:06:11 AM
Quote
Hey, with shading, how do you do like shading at an angle. As in like in aley ways. or on hte side of builinds.
Well if you're chipset doesn't have anything on it, you can always use a picture file with black to add shadow effects and you can make smooth shading by adding grey's or the buildings/objects original color. You would have to line it up correctly and find a transparency setting that looks good too.
Post by: Meiscool-2 on December 29, 2005, 05:08:21 AM
Post by: Celius_401 on January 07, 2006, 09:17:29 PM
Post by: Celius_401 on January 07, 2006, 09:21:06 PM
Good tips meiscool!
Post by: MrMister on January 07, 2006, 09:24:08 PM
Heh, you all think she is a man. That is hilarious.
Post by: Meiscool-2 on January 07, 2006, 09:45:26 PM
Post by: Zanzibar: Combat Lawyer on January 14, 2006, 02:50:24 PM
Also, what chipset did you use for the open plains house? I really don't like the one that comes with the game.
Post by: Meiscool-2 on January 17, 2006, 09:43:23 PM
Ok, my very good mapping buddy Robotam will be adding to this tut. His views on mapping are different then mine, but I consider him my equal in mapping, and honestly think he should've won the contest over myself.
He is the only one allowed to add here, the rest of you please don't add your opinions without asking me via PM first.
Post by: Robotam on April 11, 2006, 10:27:54 PM
Today however, I'm here to teach you some mapping trix and how I made my snow mountain map.
Before I made this map I hated snow chipsets, almost as much as I still hate ship chipsets.
Snow chipsets are one of those chipsets that can fool you into overlaying the map with unnecessary details. Like for an example:
A snoman in a dark and crusky snow area. Not exactly a catch.
But when I look at my new map here, I see nothing like that. I love this map, and I think it might be the first succesfull snow map I've ever made.
I know I might get to hear that it's over-detailed. But I really don't give a damn. I'm really satisfied with this map and that's the only reason I'm showing it to you.
So let's begin!
Snowy mountain tutorial: PART 1
Step 1:
Like you can see on the screenshot below I started off making this map in the lower-left corner. And I ALWAYS start my maps in the lower-left conrer, always! And I think it's really good to start off making the map there. If I start my maps anywhere else they don't turn out any good at all. I don't know why, it just is that way. So I highly recommend the lower-left corner.
If not the lower-left corner, try the lower-right. It's important to start the map on it's lower part, at least it is for me.
Now you may also hear lots of people saying "You have to know what kind of map you're making before you start making it.". That's not true at all.
I didn't plan making a huge snowy mountain from the beginning. I started off in the lower-left corner with a small forest. Then I got the idea of making a cave entrance, and from there the map developed into what I think is a great result.
In short, what have we learned from the first step?
1. Start off your maps in it's lower part for a great result. Lower-left corner highly recommended.
2. You don't have to know what kind of map you're making before you start.

Step 2:
As you can see this is where I started off building the mountain. At first I wanted a waterfall in the map, but for the sake of god... You see them all the time! You need a break from waterfalls, so therefore there are none in this map.
But already now I had the idea of how I wanted the mountain to look like in the end. What we have now looks more like a caveman's lair than anything else, and there was no way I was going to keep it like that. And from that point I started making the huge mountain.
In short, what have we learned from the second step?
1. If you want to make something big, start off with something smaller.

Step 3:
And now suddenly, as you can see below, the map got much bigger! What happened? I developed the caveman's lair into a small mountain. To make a mountain I had to change the size from 20x15 till 20x30(actually, I started off the map at that size). I love making maps in that size.
I think that deciding the size of your map is something you should start planning from the beginning, changing the size later might complicate and spoil things. You'd know I mean.
How did I do to make the mountain bigger? Well, I added what was needed. Nothing complicated.
In short, what did we learn from the third step?
1. Decide your map's size before you start on it.


Step 4:
This is were I finished the lower-layering of the mountain. Looks pretty good, eh? I also decided that I wanted the forest go behind the mountain as well. It's suppose to be a huge forest after all.
Now that I finished lower-layering all that's left is detailing. I'd like to say that this isn't exactly how I made it from scrath, I usually complete the whole lower part before I even start making the higher part. But this works just as well.


Post by: Robotam on April 11, 2006, 10:32:13 PM
Step 5:
Time for the deatailing! The part that I love the most.
As you can see I've added a some grass, a couple of spruces, a bit ice to the ground ect. The detailing part is as always up to you what you would like to add. You might wonder why I've added a fountain. It has a purpose actually, but telling you will be spoiling info from my game. I'll just say it's hot water in it.
From the beginning you enter the mountain you're main goal is to reach the top. And that's why added the ladders. From solving pussles on the inside you find your way out of the cave and up to another level from the outside again. I love that kind of stuff and that's the feeling I wanted to add to this map. And I think it worked out quite well.
I don't have much else to say. Add upper layer stuff at your own free will.


Step 6:
Onto the last step. I'm going to teach you something you maybe didn't know before. Every single chipset you use has somekind of secret, there's a way to use some tiles in the chipset in a way you could never have guessed.
Now those rocky mountain areas where it goes straight into the dark bothers me. They look too empty! So I decided to look for a cure, and after a while of exploring the chipset I found something interesting.
This:
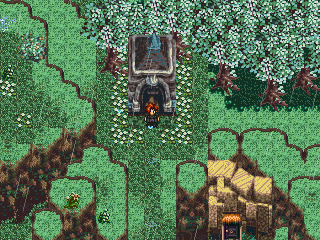
Now what is that and what can it be used for? I decided to try and replace some of the rocky ground edges on thwe lower part of my map with these soft edges instead. And as you can see on the image below it worked. After that I got the idea of trying to fill the rocky mountain areas with the same kind of thing.
That's something I didn't know worked until yesterday. If you're making a huge mountain I highly recommend that you use that technique. It fills the emptiness on the rocky areas perfectly, and that might as well be the whole reason that I became so satisfied with this map.
I also used event layering trees for the forest like you might have noticed, something I recommend as well.
However, this is the final result:


Remember, I'm not telling you that you have to do any of these things I do. Nothing is right or wrong with mapping. I'm just giving you the info on how I made it.
Post by: Robotam on April 12, 2006, 11:26:45 AM
Bridge 1
->The chipset I used<- (http://i3.photobucket.com/albums/y90/Giga_Illusion/town01_a.jpg)
+
+
=
Post by: Robotam on April 12, 2006, 11:34:31 AM
->The chipset I used<- (http://i3.photobucket.com/albums/y90/Giga_Illusion/town06_a.jpg)
+
+
+
=

Post by: Robotam on April 12, 2006, 11:38:40 AM
->The chipset I used<- (http://i3.photobucket.com/albums/y90/Giga_Illusion/town07_a.jpg)
+
=
The last one is very simple, yet very nice looking.
I hope any of these were usefull to you.
Post by: Moosetroop11 on April 12, 2006, 01:56:04 PM
Post by: Osmose on April 12, 2006, 03:53:46 PM
Big don'ts that I've seen far too many times:
-A big thing for a lot of people is adding way too much stuff in a single screen. A lot, and I mean a LOT, of people think that adding more flowers or a bunch of different animals and such will make a scene look more natural or more detailed, when too much clutter just overloads a map and makes it look too busy.
No offense, Robotam, but your map above is a prime example. Especially at the bottom, there is far too much clutter around there and makes the map not look natural, but rather, look like a failed attempt at detailing. Let's take a look at Zelda for SNES:

It's kinda small, but you can see that there are things like trees and stones and fences, but it's much cleaner and much more professional looking than the snow map above, stuffed with extra preservatives and pumped up. Think Arby's fish commercials.
-Another thing I've been noticing lately is horrid use of overlay effects. Sure, clouds on a mountain can look nice, and when used at the very top of one for a single map or two, it works, but again, this is taken by people to be a simple multiplier to the quality of a map. Again, a map does NOT look better if you smack an overlay on it. They should be used sparingly, if at all, to accentuate that the weather is different. Rain, for example, would be nice in a darker part in the story, but it's not something that should be a constant - one scene with rain is enough.
Post by: Robotam on April 12, 2006, 04:32:05 PM
And secondly, I really don't understand how you can say that map is so over-cluttered with details, and to be honest I think you're alone with that point of view.
What do we have... some grass, a bit of the earthy type of ground and two stumps, and that's over-cluttered to you? When a map is over-cluttered is when you can't move because there's too many things in the hero's way. And that Zelda map is whole different type of style. Of course it wouldn't be the same with more details.
Post by: ZeroKirbyX on April 12, 2006, 05:00:39 PM
Quote
Originally posted by Robotam
First off, me and Meiscool are the only people allowed to add to this tutorial. He said so himself a few posts away.
And secondly, I really don't understand how you can say that map is so over-cluttered with details, and to be honest I think you're alone with that point of view.
What do we have... some grass, a bit of the earthy type of ground and two stumps, and that's over-cluttered to you? When a map is over-cluttered is when you can't move because there's too many things in the hero's way. And that Zelda map is whole different type of style. Of course it wouldn't be the same with more details.
I have many examples where I hear people call me one of the greatest map makers here at charas. Why do you think that is?
I give people what they want to see, not what you want to see.
Robo, you're lettin their praise go to your head. Don't do that.
Post by: Robotam on April 13, 2006, 07:19:33 AM
I apologize if I get a bit carried away, but I haven't got as satisfied with any map like I did with this one in a long time. First thing that happens, it gets attack and defined as prime example of sucky detailing. I get to hear it's an over-cluttered map.
I like that map, and I guess that's what mathers.
Post by: Meiscool-2 on April 13, 2006, 09:11:09 PM
As to the Zelda Vs Robo mapping, you can't compare them at all. Zelda is an ABS without tiled mapping. Rpg Maker is normally RPGs with tiled mapping.
Further comments on this, if any, please be directed via PM.
Post by: Meiscool-2 on May 08, 2006, 12:13:26 AM
Thunder Script:
For all your outdoor, storming needs, here is an event that can slip onto your map and become a simple storm.
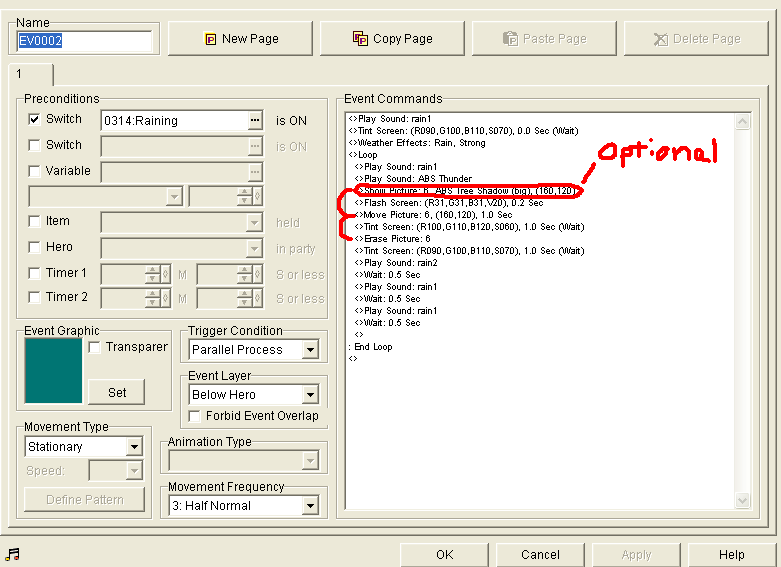
The Event:
The event starts out by playing a rain sound effect, changing the tint so it seems overcast and darker, and starting the rain on that map. The volume and strenght of the rain sound effects and visual effects are up to you. I choose Strong and 70%.
Next comes the flash of lightning, and the optional overlay, which I will explain later. The flash will be instant-like, and then the tint will remain lighter for a short period before reverting back to normal. Meaning, that when the flash of lightning comes, I had the tint get lighter to make it seem more realistic.
After that comes the pauses between each thunderbolt. As you can see, I only have a 3.5 second wait between each bolt, but you can set it to whatever you want.
Now, for the optional thing. This is for only if you're in a forest or area with trees. What it does, is by using the overlay I'm going to post below, you can make a picture that scrolls with the map that acts like the shadows of trees everytime the thunder flashes. This shadow will start at about 55% transparent, and go to 100% over the 1 second time period.
Example:
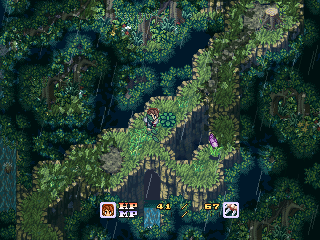
More will come, probally most of it will be event coding for your maps. I really don't know how I could give ideas on how you should map without actually telling you exactly what to do. Each map has to show their owner's traits :)
V Tree Shadow Overlay For Script V
Post by: Meiscool-2 on May 13, 2006, 02:55:16 AM
Everyone should know how to do a bird event, but if you don't, just make an event that's above hero, and put it's custom pattern to this:
Phasing mode on
Face Random Direction
Move Forward
Move Forward
Move Forward
Move Forward
Move Forward
Move Forward
Move Forward
Move Forward
Move Forward
Move Forward
Move Forward
Move Forward
Both Repeat and Ignore should be checked.
Now, this is about putting a shadow under the bird. By looking at the attachment below, you can see what it looks like, and how it's done. This, if done right, will create a bird-like shadow. You can place it a few tiles below a bird event, or you can just have it be a bird that's up high and you can only see it's shadow.
If you want it to be under another event, then you'll have to custom code both events with the same custom movement.
Note that for the flash sprite, it would be completly black. You don't need to have a black event to have a shadow, because the flash will turn the charaset black. Also, don't check repeat movement on the movement in the paralle event, only the custom movement.
Post by: Jek on July 19, 2006, 03:23:32 PM
Post by: Ruler of the Dark on July 19, 2006, 04:37:01 PM
This could've easily been hhandled via PM.
Post by: WarxePB on July 19, 2006, 10:49:40 PM
EDIT: And also, Jek, please remove the link from your title and put it in your sig instead. It's stretching the forum needlessly.
Post by: Meiscool-2 on July 27, 2006, 03:05:27 PM
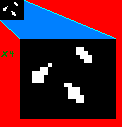
Anyways, today I'm going to post how to do lighting effects.
First off, make your map.
Mine ended up looking like this:
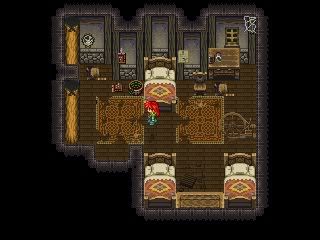
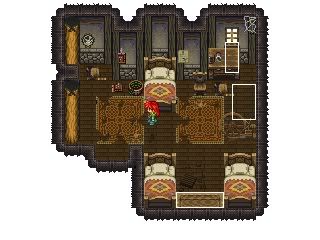
Now, take a screenshot, or however many screenshots you need to create a whole map, and assemble them in paint.
Now, here's where you actually start doing things. First, make WHITE boxes/circles where ever you light to be. Also, any areas that you don't want Black in, color WHITE.
Mine looked like this:
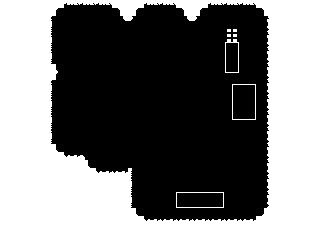
The next thing to do, is go click 'image' at the top, and scroll down to 'attributes'. When there, click the circle saying: "Black and White" and press ok. This will turn the old image into this:
Alright, next, find a light overlay. If you don't have one, or don't know what it is, use this:
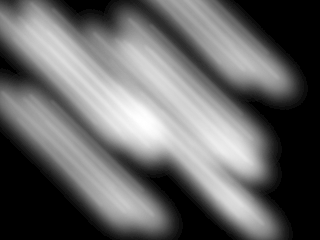
Cut the ENTIRE black and white image out onto the overlay. Most light overlays, like the one above, have several colors and shades of black and white to work with.
Next, open up the same overlay again in another paint window. Copy and paste from that overlay into places on the black and white picture with the white boxes. I got something that looked like this:
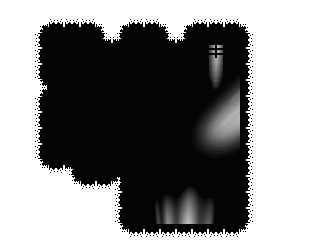
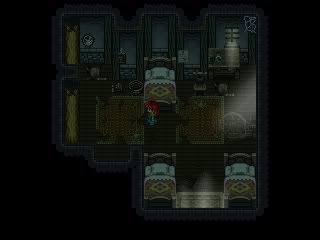
And lastly, set it up as a PICTURE with WHITE as it's transparent- background color. Make an event that lines the picture up with the screen, click: "Picture moves with screen" and animate it to where it's around 50% on up transparent. This will make it seem like a dark room with light coming through the windows.
The Final Product:
Post by: DarkFlood2 on July 29, 2006, 01:45:09 AM
Post by: Tomi on July 29, 2006, 01:59:28 AM
Post by: MrMister on July 29, 2006, 02:22:34 AM
Like, I'd put the transparency much more.. transparencier.. on most of your screenshots.
Post by: Meiscool-2 on July 29, 2006, 02:34:53 AM
Quote
Originally posted by DarkFlood2
did you use different overlays for that final pic than the one you gave as an example?
Yes.
Quote
Originally posted by MrMister
MiC, your overlays are so IN YOUR FACE overdone, though.
Like, I'd put the transparency much more.. transparencier.. on most of your screenshots.
Meh, I'm sure they are a bit less Transparent then they should be, and even though it's true that you can see better in-game then with screenshots when overlays are applied, I didn't feel like lowering the transparency then putting it back just to take screenshots.
Post by: Linkizcool on July 31, 2006, 01:55:42 AM
Post by: Meiscool-2 on July 31, 2006, 02:00:19 AM
Below: Use the red circle to change the color of the fire (make it darker or lighter) Use the blue circle to change size (like it's flickering, make it larger or smalled) and use the green circle to change it's transparency (make it brighter/more visible or darker)
Post by: Linkizcool on July 31, 2006, 02:11:02 AM
Post by: Meiscool-2 on July 31, 2006, 02:20:33 AM
Post by: Linkizcool on July 31, 2006, 02:24:34 AM
Post by: Me5kuTis on July 31, 2006, 04:50:40 AM
Post by: Meiscool-2 on August 05, 2006, 02:37:50 PM
Quote
Originally posted by Linkizcool
Lol, ok. Thank anyway. ;)
EK! I never answered your question.
Alright, here's what your looping picture event should look like:
>Show Picture
> Begin Loop
> Move Same Picture (Let's saw you're making a flickering fire, in that case, I would increase the size by 5%, make the color a little brighter, and increase the transparency by 10%, all over a 1 second time frame. Put Wait ON)
*Because wait is on, you can go directly to the next command*
> Move Same Picture back to original Show Picture Color, Size, and Trans. Put the wait to 10 or 1.0 second.
> End Loop
Post by: GrooveMan.exe on August 06, 2006, 07:58:34 AM
You covered Castle towns, but what about modern towns with Skyscrapers and stuff? Modern buildings are a bit more rigid in design, so how do you stop them from becoming stale in maps?
Post by: Linkizcool on August 06, 2006, 04:16:49 PM
Post by: Meiscool-2 on August 06, 2006, 06:49:06 PM
Quote
Originally posted by GrooveMan.exe
Hopefully, this topic is recent enough for this to not count as necro-posting.
You covered Castle towns, but what about modern towns with Skyscrapers and stuff? Modern buildings are a bit more rigid in design, so how do you stop them from becoming stale in maps?
Add things to each building that makes it different. Billboards, FlowerBeds, etc. Even cracks in the foundation.
Post by: aboutasoandthis on August 07, 2006, 01:11:17 AM
Post by: Meiscool-2 on August 15, 2006, 05:48:58 PM
Falling Leafs:
Examples:
The first thing you should know, is when creating falling leafs, you will need at LEAST 3 pictures for them to run smoothly. However, depending on the flow you want, I recomend using around 10.
I've done two different types, one being many leafs at once, the other being just a few leafs. I'll say, many leafs doesn't look real great, but then again, I made it when I wasn't an expert coder.
1) How to do many leafs:
Example:
First off (when doing many leafs) make a LARGE picture file. 640X480 should be good enough. Now, I know that the normal picture only requires 320X240, because that's the size of the RPG Maker screen, but: You will be moving awhile these leafs move. If your picture is only 320X240, then when you move, you'll see blank spaces between each picture wait period.
This is an example of a 320X240 'many leafs' picture:
To make it 640X480: Copy it once, then set the pixels in paint to 640X480. Then paste it three times to fill in the spaces.
Now, to make them look like actual leafs, use the same colors as the trees on your map. Also, it's recommended that you make them in one of these three shapes:
--------------------------------------------------
Now that your leafs are made, we can now work on the actual coding. I'm only going to use Six pictures here, but you can and probally should use more to prevent flaws. If at any time it ever looks like there are TO MANY leafs, then don't lessen the ammount of pictures you use. Instead, take out some of the leafs on the picture file itself using paint.
Depending on where you want the picture to start (upper left or upper right), is where you'll want the X and Y screen Cords. Also, note that all pictures SHOULD move with screen. Lastly, these pictures should sorta Waver.
Picture 1: Start it at -480/-640, and have it move to 480/640 over a period of whatever time you want.
Wait about .2
Picture 2: Start it at -480/-960 (or whatever highest number you can get.
Picture 3: Start it at -480/+640
Move them where ever you want, and if the time of movement is 1 second, then wait .5 and start the next set of pictures, 4 being the same as 1, 5 being the same as 2, and 3 being the same as 6.
Now, if you use more pictures, you can use a smaller picture size. Smaller pictures cause less lag and bugs. I recomend you use a lot of pictures.
-----------------------------------------------------------------
2) Few Leafs.
Example:
How to make it: I'm feeling lazy. I'll update later.
Post by: Linkizcool on August 15, 2006, 10:06:06 PM
Post by: Thunderstrike on September 03, 2006, 03:14:37 AM
great tut, I will use it a lot in my game
you've definately inspired me to detail my maps more :D
Post by: DarkBell on February 03, 2007, 03:56:55 AM
I'll say I respect you!! You are cool after all
but can you help me with somehow Labatory :(
Post by: ZeroX5 on February 03, 2007, 08:42:26 AM
Post by: Danteskewl on March 18, 2007, 05:54:14 PM
:guns:
Post by: coreystranick on March 18, 2007, 06:52:36 PM
Post by: Dragonium on March 18, 2007, 07:53:38 PM
Post by: Serano65 on March 30, 2007, 06:12:41 PM
Post by: Meiscool-2 on March 30, 2007, 06:48:31 PM
Quote
Originally posted by ZeroX5
Good job meiscool...is the tree a pic ? it looks not like a chipset o,o
It's part of the chipset, it just took up a large part of it.
Quote
Originally posted by Danteskewl
great tutorial, but is there anyway you send/tell me where to get the rabbits and butterflies and stuff you used to make the places look more natural?
:guns:
Search the complete resources. There are bunnies and other animals in there.
Quote
Originally posted by Serano65
i really like but what about the insides of thing like castles, homes, shops, and dungens?
Maybe later. Till then, you should probally read Robotam's guide to caves and insides.
Post by: ellie-is on April 27, 2007, 08:36:17 PM
Post by: Dele on April 30, 2007, 04:50:18 PM
Anyways a castle/dungeon tut would be great I always have troubles with those. However I can see how it would be much more difficult to explain due to most of them are created solely from the mappers' imagination. Chipsets have a huge impact too of course.
Post by: Terradont on April 07, 2009, 09:38:52 AM
The only problem is that i'll need to remake most of my maps for my game, but i haven't gotten that far yet.
Post by: Terradont on April 07, 2009, 01:15:44 PM
Post by: Cerebus on April 07, 2009, 01:44:10 PM
Post by: Terradont on April 07, 2009, 03:48:50 PM
Post by: Valiere on April 07, 2009, 06:52:14 PM
Post by: Prpl_Mage on April 07, 2009, 06:58:30 PM
Post by: SaiKar on April 07, 2009, 07:31:28 PM
But no. Tutorials forum is one of the few places where it's pretty much okay to kick stuff. It'd be nice if he'd actually added something other than "this is nice," but it's fine.
Post by: Prpl_Mage on April 07, 2009, 07:51:25 PM
Post by: Fisherson on April 08, 2009, 04:06:06 PM
I miss Meis and his maps.
I miss his chipsets, i could use that "floating city"chip.
Post by: Uberpwn_w00t on April 08, 2009, 05:33:20 PM
Which would explain his username.
Post by: DedlellyDeth on April 08, 2009, 05:37:27 PM
Meis was cool.
Which would explain his username.
Me...mewascool... waaaaah. T.T *sniffle*
Post by: HobomasterXXX on April 08, 2009, 11:45:19 PM
I miss his chipsets, i could use that "floating city"chip.IIRC, i think all of his chips were just various compiled tiles from SNES games.
Post by: ellie-is on April 09, 2009, 12:40:39 AM
Post by: coreystranick on April 09, 2009, 12:56:31 AM
Post by: Fisherson on April 09, 2009, 04:23:52 PM
floating city is in CR i believe as well, as is alot of his stuff
What's it called? I orgianly envisioned Charisia as a Floating Futuristic City and could realy use that set.
Post by: Rahl on April 19, 2009, 04:58:06 PM
Also he posted them all in a thread before he left a few years ago.
Which thread did he post them in?
Post by: coreystranick on April 19, 2009, 05:27:12 PM