Post by: A Forgotten Legend on August 21, 2007, 01:28:33 PM
An Idiots Guide On How to use the Charas Generators
Written by A Forgotten Legend
So you think your ready to make a character for your game with the charas generators? Well, here's a nice in depth guide to making one!
What you need:
A program that can can an Images size (NOT scaling the image to a different size, changing the canvas size!)
Ultimate Paint/any other image program EXCEPT paint that converts to 256 colors
RPG Maker 2000/2003 (Parts are RmXP specific as well)
Time to read this and make a character!
Table of Contents
Use the find option (Ctrl+F) in your browser to find what you looking for. Use the numbers I give to the right if the part of the guide to make finding things easy.
Beginning your character 1.0
RPG Maker XP Compatible? 1.1
The Charset Generator 2.0
Body 2.1
Head 2.2
Dress(Clothes) 2.3
Hairs 2.4
Items 2.5
Different Sized Characters 2.6
Image Size 2.7
The Battle Charset Generator 3.0
Body 3.1
Head 3.2
Dress(Clothes) 3.3
Hairs 3.4
Items 3.5
Image Size 3.6
The Faceset Generator 4.0
Base 4.1
Eyes 4.2
Expressions 4.3
Hairs 4.4
Items 4.5
Image Size 4.6
Importing your Character 5.0
The Image Size 5.1
256 Colors 5.2
Import Button 5.3
The End 5.4
RPG Maker XP Users 6.0
1.0
Beginning your character.
So, you want to make a character with the Charas generators. But, you have no clue how to do it! First off, a Charset is an image in RPG Maker with 8 characters on it. Yes, 8. What you make on the charset generator is only 1/8th the size of a charset. A Faceset is an image in RPG Maker with 16 different faces on it. Yes, 16. What you make on the faceset generator is only 1/16 the actual faceset. A Battle Charset is an image in RPG Maker with different stances for battles in RPG Maker 2003. These are not used in RPG Maker 2000. The Battlechar Generator actually produces an image that is two of the Battle charset sheets. You will need to split them up before importing. But, more on that later.
1.1
RPG Maker Xp Compatible?
No, none of these are RPG Maker Xp compatible in their current state. Please go to RPG Maker XP users(6.0) for more information on how to make them usable in XP.
2.0
The Charset Generator
As I explained above, a charset is an image in RPG Maker with 8 characters on it. What you make on the charset generator is only 1/8th the size of a charset. That means later on, you will have to open it up in another program and do some editing.
First, you are going to have to open up the charset generator. Go to this link to get there now: http://charas-project.net/charas2/index.php?lang=en&generator=1 (http://charas-project.net/charas2/index.php?lang=en&generator=1)
2.1
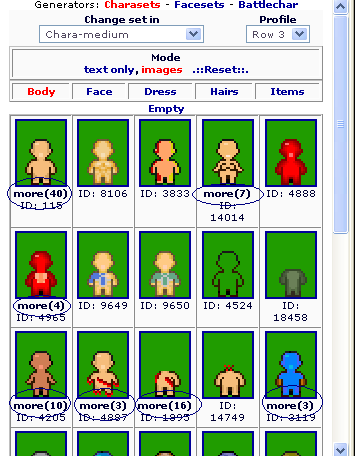
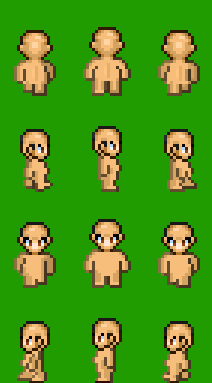
Body
So, you have the charset generator open? Good. Now let's begin. First, choose a Body. Look to the left of the screen, see the different Bodies? Click on the one you want to use. If the image has more (x) ("x" being a number) there are more color choices.
So, once you choose your body and click on the one you want, you should see this one the right side of your screen.
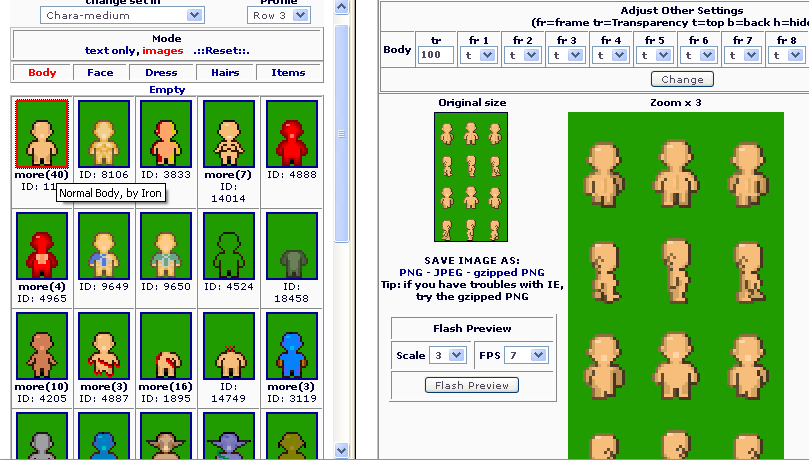
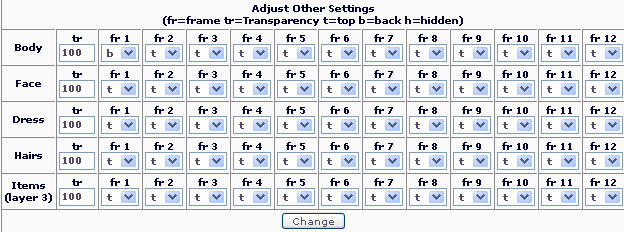
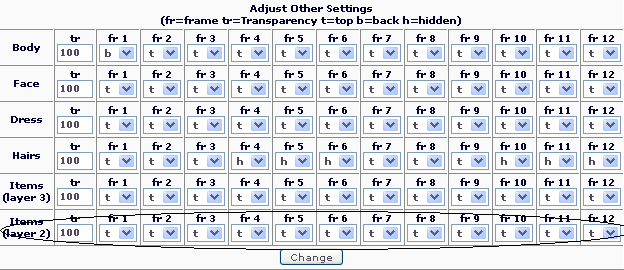
Look at the options above the image in the right.
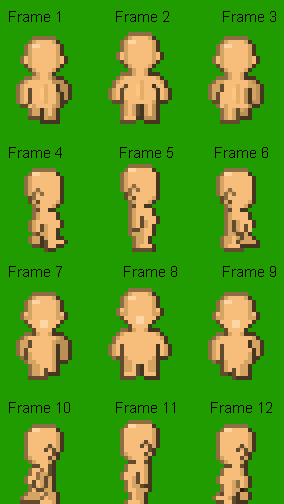
"tr" stands for Transparency. "fr" stands for frame. The frames are numbered like so:
In the drop down boxes below the "fr"s, there are three options. "t" (top) "b" (bottom) and "h" (hidden). If you choose "t", the frame will be on top of everything, if you choose "b", the frame will be below everything, and if you choose "h", the frame will be hidden. This normally is used for Items. More on those later.
Congrats, you made a body! Now, let's move onto the heads.
2.2
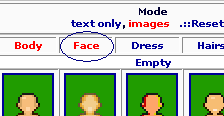
Head
So,now that you have a body, click the Head link on the left side of your screen:
Once you've clicked that, you should see a whole bunch of floating heads! No, not really, but you will see many heads you can use for your characters. Click on one. Again, if it has "more (x)" you can choose different colors, even some different styles.
So, here's my character so far,
So, thats pretty much it with the Heads, experiment on which ones you like and such. Now let's move on to the clothes!
2.3
Dress
Oh no! Our character is naked! Ack! Let's put some clothes on them shall we? Now, I hope you've already decided what gender you want your character. Mine of course is a male. So, scroll down through the clothes on the left side and find something for your character. Make sure you find clothes that match your characters personality. Don't make the undead leader of hell wear some pink dress. I mean, what the hell? The only way that works is if you are maing a comedy.
So, I've found what I want my character to wear. Have you?
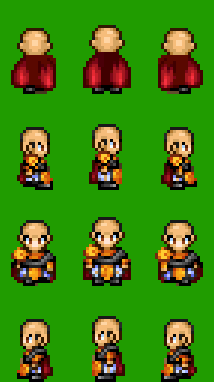
So now that our character is not naked, let's move on to Hair.
2.4
Hairs
Ah, hair. Adds a bit more color to your character. Now first we need to pick a hair, just like we picked the clothes.
Found anything you want for your character? I have. Again, make sure it matches your character. Don't make the great emperor of a huge nation have huge pink spiky hair. Thats just plain silly (again, exception being a comedic game). So, here's mine:
And so, we are are close to ending the Charset part of the guide. Next is the Item section.
2.5
Items
One of the hardest parts to understand in the charset generator. Remember the "tr", "t", "b", and "h"? Those are used here the most often.
First, decide what you want your character to have. I'll make mine have a sword... and maybe a shield. But to have both, I'll need to use the Layer 1, Layer 2, and Layer 3 options!
Layers 1,2, and 3 are different levels on which you can put an item onto a character with.
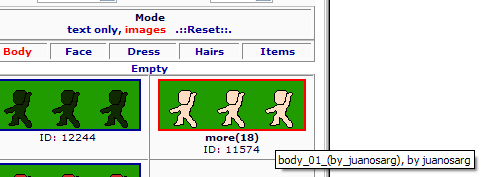
Layer 3 being the bottom layer, Layer 2 being the middle layer, and Layer 1 being the top layer. You can only have one Item on each layer. So, to being, let's put a hat on our character. I want to make it one Layer 3. But how? Go up to where the Body, Head, Dress, Hairs, and Item links are, right below it, you should see this:
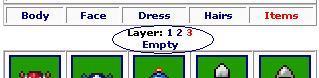
The empty option will get rid of any item you have on the currently selected layer. The layer currently selected will be in red. Right now, I have the 3rd layer open. Now, I'm going to find a hat I like and add it to my character.
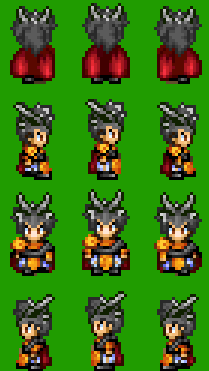
On no! My hat doesn't fit him! Now is where the "h" option comes in handy. Find the area I talked about earlier that has the "t", "b", and "h" options. Notice it has gotten a bit bigger since we talked about it. Here is a picture of it:
So, here is what you do. Remember the image I had that numbered the frames? If you don't, here it is:
Well, In my character, the frames that go right and left are the ones I need to change. Now, the corresponding frames are 4-6 and 10-12. I now have to go up to that huge box with the frame options in it (the image I had showed right before the last one). I'm going to go to the area "Hairs".
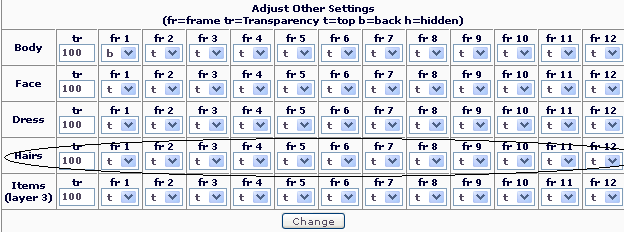
I am now going to go to frames 4, 5, 6, 10, 11, 12. i go to the drop down boxes, and change them to "h". That way they are hidden. Now go to the change button.
NOTE: Nothing will change unless you press this button.
Here is my character now:
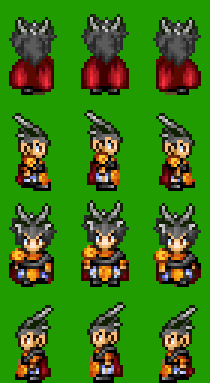
Of course, he still doesn't look perfect, but, I can use Paint to fix it up later in a program like paint.
So, now, I want to make him have a shield, now, let's go to layer 2!
So, I've found a shield. This shield luckily had it already so then it was behind my character in Frames 1, 2, and 3:
Now, if it didn't do that, I'd have to do this:
Go back to this box:
This time instead of going to the hair, we are going to the Items (Layer 2) area.
Now, I'm going to change Frames 1, 2, and 3 to "h". Now that should be fixed. If you ever have an item that in one frame looks like it should be behind the character, then choose the "b" option.
Now, I'm going to finish my character by putting in a sword. First I'm going to go to Layer 1. And then find a sword.
On no! The first 3 frames, the sword should be behind the character! Let's use the "b" option and fix it!
This time I'm going to go to Items and change Frames 1, 2, and 3 to "b". And just to make it look a little better, I'll do the same with the last 3 frames as well.
I'm done yay! But... not quite.
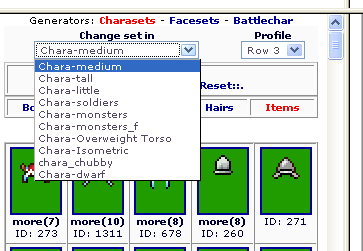
2.6
Different Sized Characters
If you noticed the option that you could make different sized characters, this is what I'm talking about.
There are 10 different options from you to choose from.
Medium, Tall, Little, Soilders, Monsters, Monsters_f, Overweight Torso, Isometric, Chubby, and Dwarf. Experiment with each a little bit and figure out which one you like best.
2.7
Image Sizes
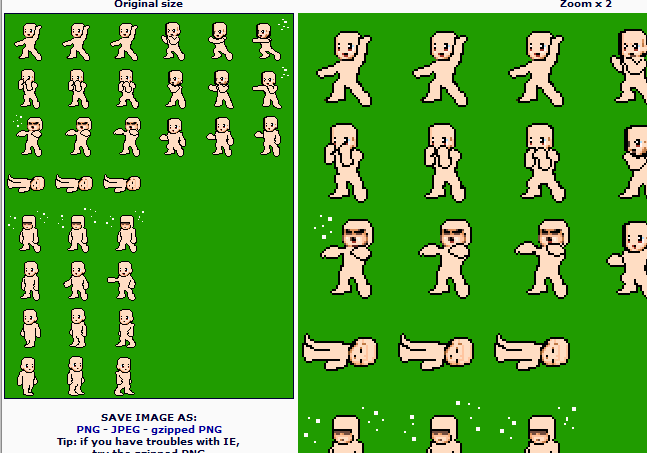
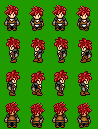
You remember me talking about that a character you make in the generator is only 1/8 the size of a charset? Well here is where I talk about what you do to make it. First, let's look at the RTP (Run-time package) charset that comes with RPG Maker.
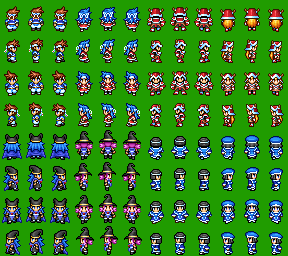
(this one comes with both 2000, and 2003)
Notice there are 8 characters on it? First, save your character. Do NOT save the character at 3x. Click here:
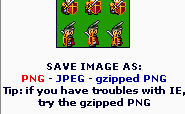
Notice the different file types. Please follow the directions below those file types.
Now that you've saved it, there are two ways I'm going to describe to you to make it able to be imported into RPG Maker 2000/2003.
Option 1
1.Create a new image with the Height of 256 and the width of 288.
2.Paste you newly saved character into the image.
3. Save as a PNG or BMP file.
4. Open it in a program like Ultimate Paint or somethign similar that will save in 256 colors. Do NOT use Paint. It will ruin your colors.
5. Import into RPG maker. (More info on that later)
Option 2
1.Open up your newly saved character.
2. Change the Canvas size to 288 width, 256 height. DO NOT CHANGE YOUR CHARACTERS HEIGHT OR WIDTH AT ALL.
3.0
The Battle Charset Generator
RPG Maker 2003 has a side view default battle system similar to that of the Final Fantasy series. Those battle characters are for people with Rm2k3 to use for their characters. Is how I put it to someone who didnt know what they were for.
And they are exactly that. Generated character sets designed for RPG Maker 2003s battle system. This part of the tutorial will describe how to make your battle characters as well as changing so they will work in your game. :)
This section is for people using RPG Maker 2003 (Rm2k3)
This generator can be viewed here:
http://charas-project.net/charas2/index.php?lang=en&generator=3 (http://charas-project.net/charas2/index.php?lang=en&generator=3)
3.1
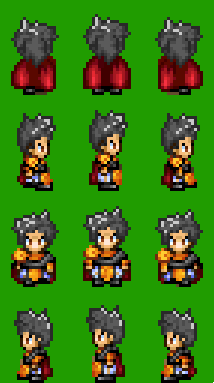
Body
So, you want to create an RTP styled (Or FF5 styled) battle character! Unfortunately, there arent that many resources for this generator. But, you can get around that by editing them to your liking or making new resources for everyone else to use to! I wont go over on how to do that in this guide.
Now, first off, lets open the Battle Character Generator. (Or from now on, Ill call it the Battlechar Gen. so I dont have to type the whole thing out. _sweat_ )
You can get there by clicking here: http://charas-project.net/charas2/index.php
So, you should now see the Battle Char Gen.! You should first see that the interface is similar (almost the same in fact) as the Charset generator. So, lets begin shall we?
First, click on the body you want to use. I think Ill choose this one.
Did you notice how this generator also has the more (x) in it? That means there are different colors of that resource. When you click on that resource, a pop up will come up asking which one you want. Simple? Yes.
Now that we have our body. Lets move onto the face.
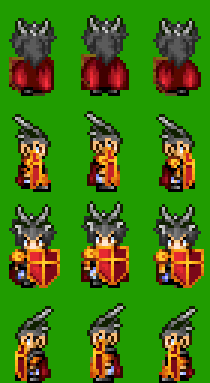
3.2
Face
Its now time to give our new character a face. Choose which face you want to give your character. Also, remember what kind of character they are. If theyre always angry or sad, dont give the happiest face you can find! So, do you have a face? Good. Here is what my character looks like so far.
Using the generators gets easier if you learn how to use one first! They all follow the same concepts. Lets continue to Dress.
3.3
Dress
Again, you now have to figure out what gender you want your character. I mean, why would you put a guy in a dress? (All of my examples seem to exclude comedies .)
This time, Ill make a girl character. Choose something for the character to wear and then well continue to the next part.
So, here is mine so far:
3.4
Hairs
Ack! Shes bald! But, we can fix this! Choose a hair piece for your character. Some instances may not call for you to be gender specific for this one, but try your best not to cross the defined line of cross dresser. Once you have a hair piece, continue to Items!
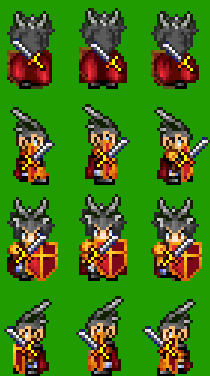
3.5
Items
Items in the BattleChar Generator act exactly the same as the Item generator. Except that now, there are more frames. Most of the resources in this section will fit your character perfectly. There are some exceptions in the Hair part of this generator, but nothing too major.
For more information on Items, go to the Charset Generator section on Items. (2.5)
The only difference between Items in the Charset generator and the BattleChar Gen. is the fact that the battle gen. only has one possible layer for items. That means only one item per battle charset. Choose an item for your character. (You dont really have to though!)
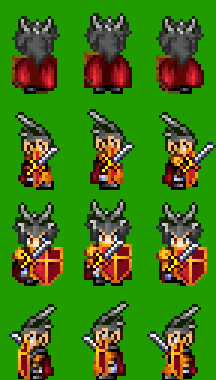
So, now that youve finished up the items, Youve made your battle character! (Yay!) But, your not done yet. (Aw .) There is a bit more that needs done before you can import it into RPG Maker 2003.
3.6
Image Size
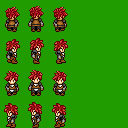
First, you have to save your character! Save it just like you did with the Charset generator.
Example from that generator:
1. Now that youve saved it, I suggest opening up Paint. Now, without closing that one, open up another one. (Just to be safe!)
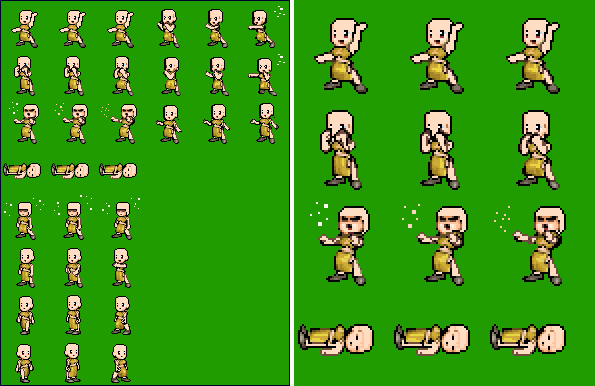
2. Check the size of your image (by going to Image>>Attributes) Notice the size is 288 in width, and 384 in height. Now, lets take a look at what I said in the beginning:
Quote
Quotes from beginning of this guide
A Battle Charset is an image in RPG Maker with different stances for battles in RPG Maker 2003. These are not used in RPG Maker 2000. The Battlechar Generator actually produces an image that is two of the Battle Charset sheets. You will need to split them up before importing.
That is exactly what we are going to do! :happy:
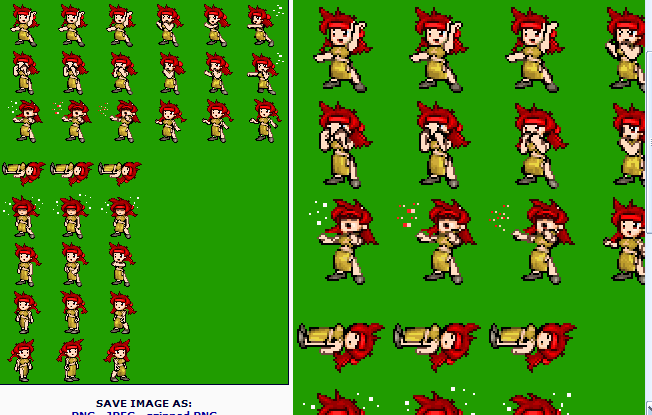
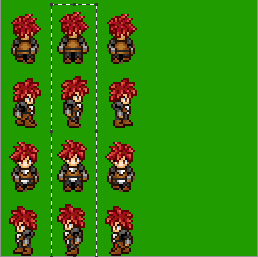
3. Open up your image in the first Paint window, and then the second one.
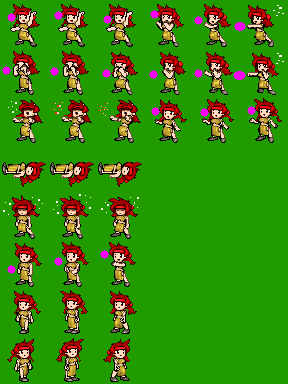
4. Go to Paint Window 1. Change the width (by going back to attributes) of that image to 144. See how you just cut off ½ of your battlecharset? Thats whats supposed to happen!
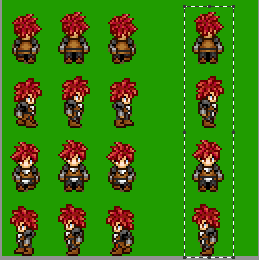
5. Go to Paint Window 2. Now, this one is a bit trickier. You are going to have to take the Second half of the Battle character (the one we took out in Paint Window 1) and make it the only thing in the image. You can do that many ways, but I think its easiest to just move it over until it has taken out the left half. Now change the width to 144.
Youve made your battle character! Now, use a program to convert the image to 256 colors. (DO NOT USE PAINT TO DO THIS. IT WILL RUIN YOUR COLORS.) I suggest Ultimate Paint or Paint Shop Pro.
You can now import the character into you BattleCharSet section of the Resource manager. Never just place the image into the folder. Always import the image.
Thats all for the Battle Character Generator!
6.0
RPG Maker XP users
Because of the most recent question being how to convert Charas made characters to RmXP format. I know how to do this! :happy:
So, I'll show you how.
First off, you need to make your character in the generator. Now, be warned, the Faceset and Battle Charset generators will not work for any of the default systems in XP.
So, let's begin. First, open up your character (not a charset!) in Paint.
Next, change the image size (NOT the character's size) to 128 by 128.
Like so:
Right click the green area with the eyedropper tool.

(Zoom in to 2x) Now use the Cut and Paste Tool and copy this area:
Next, move it here:
You image now looks like this:
Now, space your character out evenly. So itll look something like this:
Now, we need to change the positions! Because, in XP, the alignments are different!
So, move you characters positions around until it looks like this:
So, your character should be ready to import. Yes, mine is aligned right, I just checked. Use mine as a template. :)
But, if your character seems to jump while walking, go back to your image and edit it a few pixels in the opposite direction. :)
Again, the Faceset generator and BattleCharset Generator can only be used if you have custom scripts. I won't go into detail, however.
Thats all for now!
Any questions can also be PM'd to me. :)
Post by: Grandy on August 21, 2007, 01:57:56 PM
But nice tutorial, I guess.
Post by: A Forgotten Legend on August 21, 2007, 01:59:56 PM
I don't like the 8 image limit. (gr...)
Post by: Dragoon de Sol on August 21, 2007, 02:21:17 PM
Post by: A Forgotten Legend on August 21, 2007, 02:28:03 PM
Post by: ZeroKirbyX on August 21, 2007, 04:31:51 PM
Post by: A Forgotten Legend on August 21, 2007, 05:11:28 PM
I just used html instead of the IMG tags...
Post by: aboutasoandthis on August 21, 2007, 08:03:14 PM
Post by: A Forgotten Legend on August 23, 2007, 01:43:22 PM
Post by: Bugs on March 04, 2008, 02:30:52 AM
and i took it from the site, theres any diference on versions?
Post by: A Forgotten Legend on March 04, 2008, 02:34:23 AM
Please give more explanation. :)
EDIT:
This guide covers these two generators so far:
Charset Generator (http://charas-project.net/charas2/index.php)
BattleCharset Generator (http://www.charas-project.net/charas2/index.php?lang=en&generator=3)
Post by: ellie-is on March 01, 2009, 07:15:55 PM
Post by: A Forgotten Legend on March 01, 2009, 07:18:03 PM
EDIT: I just realized that this was written more than a year ago. o.o Wow I've been slacking.
Post by: ellie-is on March 01, 2009, 08:17:06 PM
Post by: fruckert on March 01, 2009, 08:23:51 PM
It's a good guide
Post by: TGF on March 03, 2009, 10:41:30 PM
Nice guide, pretty useful. "Charas for Dummies"
Post by: zuhane on March 03, 2009, 11:01:03 PM
Post by: ellie-is on March 03, 2009, 11:28:46 PM
Post by: SomeNick on March 04, 2009, 05:37:34 AM
Post by: zuhane on March 04, 2009, 09:28:50 AM
Wtf dude. You didnt knew that? >___<"
Joking lolz
Post by: ellie-is on March 04, 2009, 03:44:16 PM
It would be great if there was a way to know wether the image you use in the character generator is original or comes from a game or RPGMaker. Some images / parts are clearly identified (Aeris FF7, and such), but some other images are not, and since I haven't played every single game and RPG out there, I would not know with 100% certainty if an image is original or not. I plan to make a game but not in any of the RPG Makers, and I don't want any potential legal issues arising. Though I guess I should propose this feature somewhere else...Dont worry. If its original, whoever uploaded it knew it would be used by other people.
If its from a game... Dont worry. As long as you dont sell the game... And making comercial game with charas ex, that would be just silly. Low quality sprites and stuff.
Post by: scorpiovaeden on November 18, 2010, 01:14:10 AM